This site is based on Wagtail and run in Google Cloud. There are a lot of information out there on how to set up a Wagtail site and deploy it on Google Cloud so in this post I will only sumarize the development loop and tecnologies I use.
If you look for a step by step tutorial or exhaustive information about any topic you can visit the links in the reference section at the end of this post.
Development loop
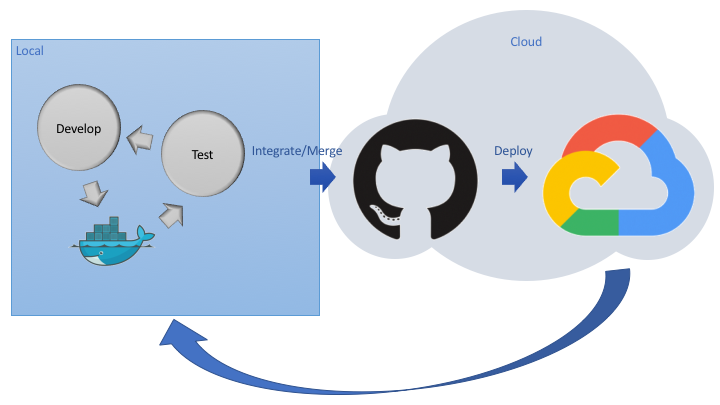
Local actions
First you can start basic Wagtail site and test localy to ensure it is all right.
> wagtail start mysite .
You might follow getting started tutorial for a complete description for creating a Wagtail site.
Then I recommend to containerize with Docker and continue developing with containers. You can follow detailed instructions in get started guide and in the Python specific guide.
Going to Cloud
First step after you have an initial development would be to push your code to a versions control repository, I use GitHub.
Once you have a functional version of your code it's time to deploy it to public, one option is on Google Cloud Run for containerized applications.
Basic steps to Cloud Run Deploy:
- Install Cloud SDK
- Create new project in Cloud Console or reuse existing one
-
enable cloud APIs
> gcloud services enable \ run.googleapis.com \ sql-component.googleapis.com \ sqladmin.googleapis.com \ compute.googleapis.com \ cloudbuild.googleapis.com \ secretmanager.googleapis.com -
Create Backing services
-
Create Database
> gcloud sql instances create myinstance --project [PROJECT_ID] \-\-database-version POSTGRES_13 --tier db-f1-micro --region [REGION] -
Create Storage Bucket
> gsutil mb -l [REGION] gs://[GS_BUCKET_NAME]

> gsutil cors set cors.json gs://[GS_BUCKET_NAME]
Last command apply Cross Origin Resource Sharing (CORS) settings at cors.json file, since objects stored in the bucket will have a different origin (a bucket URL rather than a Cloud Run URL).
-
Create secret for configuration Files
> gcloud secrets create application_settings --data-file .env
-
-
Configure Project
- To use Google Cloud Services
- To access Database
- To use ENV variables from secrets storage
- create requirements.txt file for dependencies
You can see detailed information in Google Codelabs Wagtail on Cloud Run.
-
Dockerize the project for Google Cloud
- Create Dockerfile
- Build container with Google Cloud
> gcloud builds submit --tag gcr.io/[PROJECT_ID]/[PROJECT_NAME]
-
Run migrations
-
Allow access to components
> gcloud secrets add-iam-policy-binding application_settings \ --member serviceAccount:[CLOUDBUILD] --role roles/secretmanager.secretAccessor > gcloud projects add-iam-policy-binding [PROJECT_ID] \ --member serviceAccount:[CLOUDBUILD] --role roles/cloudsql.client -
Create the migration configuration
- Run migrations in Cloud
> gcloud builds submit --config cloudmigrate.yaml \
    --substitutions _REGION=[REGION]
-
-
Deploy to Cloud Run
    > gcloud run deploy [PROJECT_NAME] --platform managed --region [REGION] \
      --image gcr.io/[PROJECT_ID]/[PROJECT_NAME] \
      --add-cloudsql-instances [PROJECT_ID]:[REGION]:myinstance \
      --allow-unauthenticated
After the first version you probably will continue developing and to deploy again your new code you will need to: - Build a new image:
> gcloud builds submit . . .
-
Run migrations if there are changes in statics or database:
> gcloud builds submit --config cloudmigrate.yaml . . . -
Re-deploy:
> gcloud run deploy . . .